
Business order information bulk upload - User guide



Overview
Amazon Business administrators can use a spreadsheet to upload or modify business order information (BOI) settings in bulk. Use this guide to prepare the file, upload it, and confirm the results.
When to use bulk upload
Bulk upload is most effective in these situations:
Initial setup: You are setting up BOI for the first time and need to manage settings simultaneously.
Large-scale configurations: You need to set up more than five BOI settings at once.
Multi-group deployments: Your business account contains several distinct groups that each need their own BOI settings defined.
Standardization: You want to ensure all BOI settings are defined consistently across your organization.
Configuration changes: You want to modify multiple existing BOI settings in bulk.
Auditing: You need to audit BOI settings across all subgroups through one action.
Prerequisites
Ensure you have an active Amazon Business account with the Admin role enabled at the appropriate access levels. If you are an Admin for the top-level group of your account, you can configure settings for the entire account by accessing the top-level group’s Business order info settings page. If you are an Admin user for a specific sub-group of your account, you can only audit business order information settings for your specific groups.
Accessing bulk uploads
To access the bulk upload workflow, complete the following steps.
Sign in to Amazon Business.
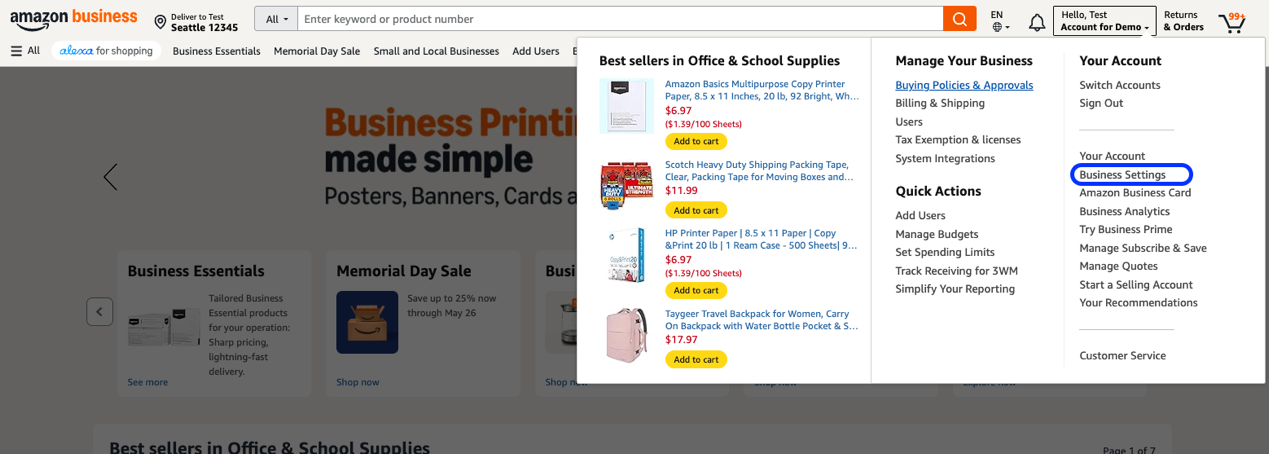
Open the Your account dropdown menu.
Select Business Settings.
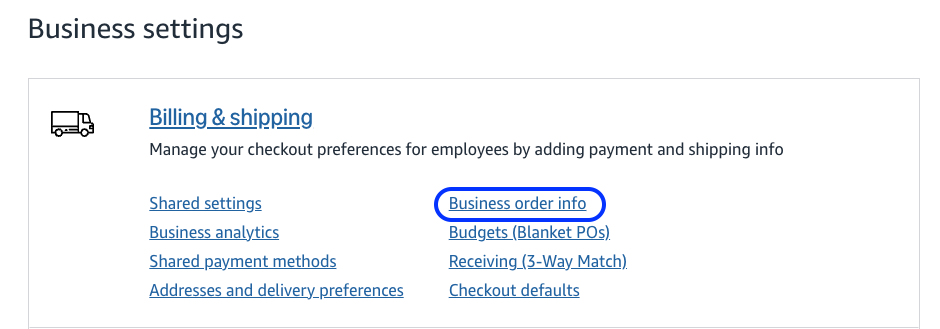
Select Business order info.
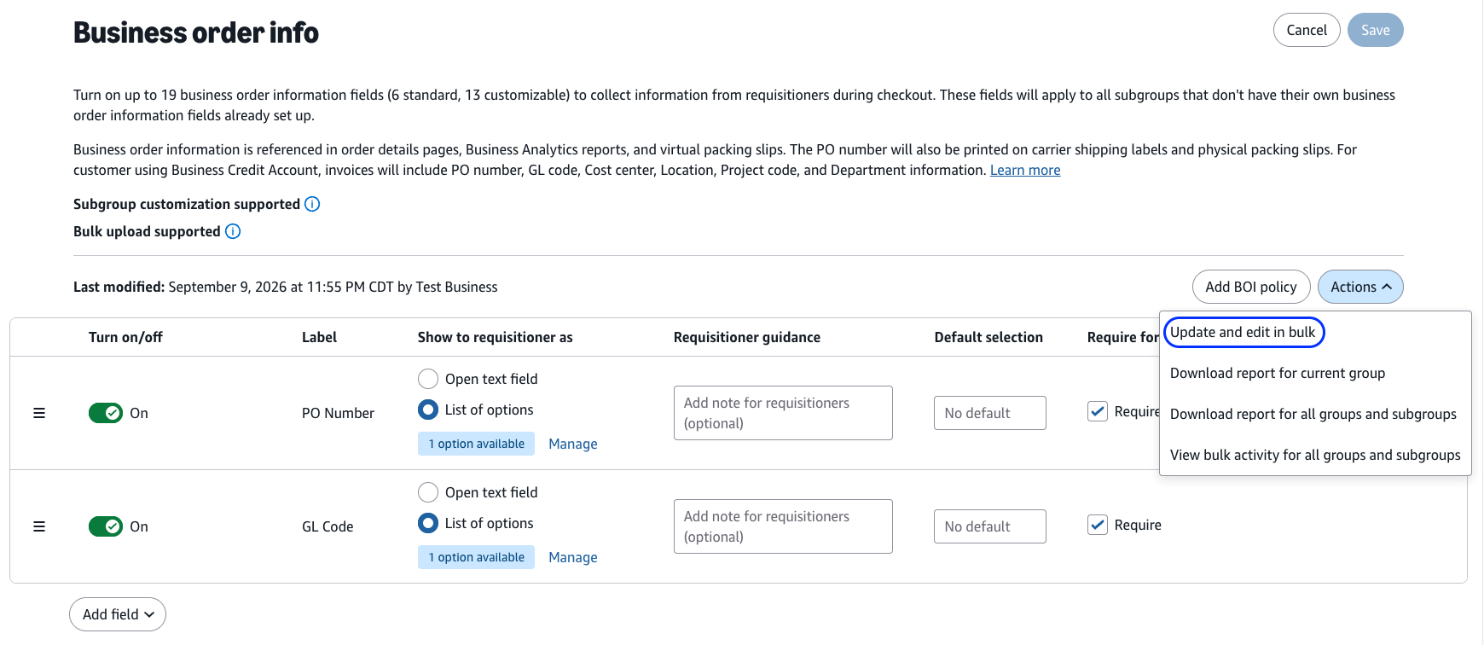
Select Actions, and in the dropdown menu, select Upload and edit in bulk.
Select Download template. The template downloads in .xls format.
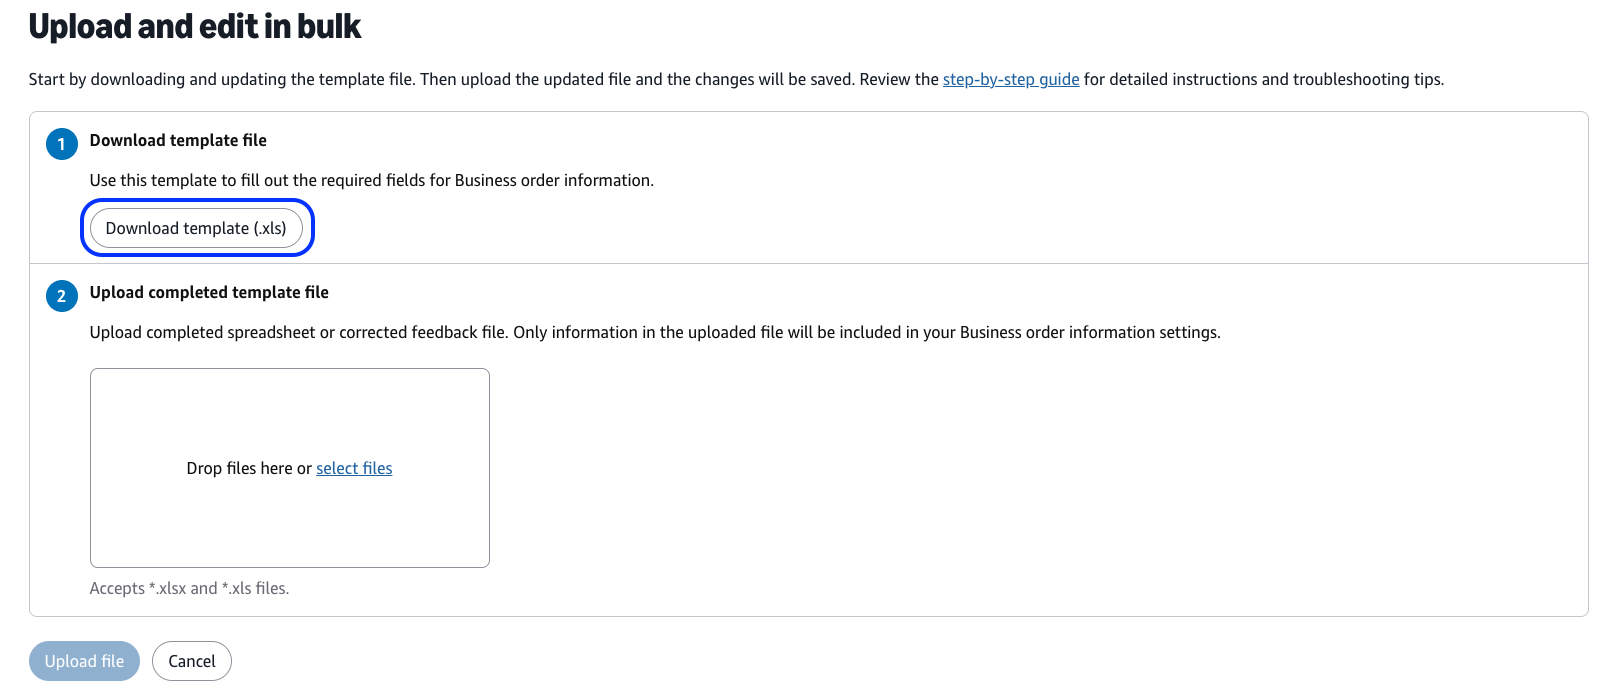
Open the template in your preferred spreadsheet application.
Filling out the template
After downloading the template, proceed to fill it out. The template has two primary sections: The Business Order Information tab defines the BOI settings you want to configure for your groups or sub-groups, with one row per Group Path / BOI setting pair. The setting-specific tabs at the bottom of the spreadsheet allow you to define preset values for each BOI setting as needed. Use both sections to complete your configuration.
Before completing the template, note these file behaviors:
Each row represents the configuration for one setting for one account group or sub-group.
Use the setting-specific tabs to view all available options for dropdown settings.
Save your completed template in .xls or .xlsx format. The file size limit is 10 MB.
To fill out the template, follow these column-by-column steps for each BOI setting you want to configure for each group:
Note: Repeat these steps for each configuration you want to add. For example, if you want to add GL code and Purchase Order (PO) number settings to two separate groups, you need to complete four rows: one row per group and setting pairing.
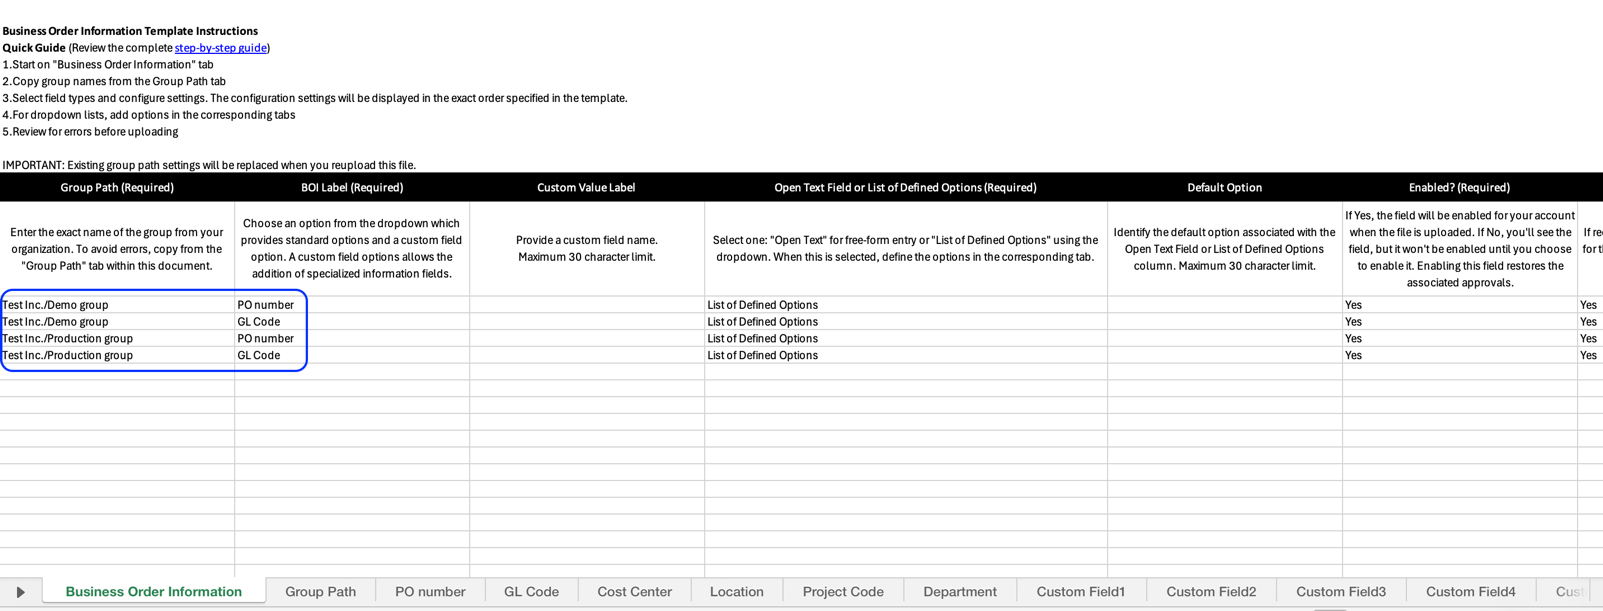
Column A: Group path
To identify the group that receives the setting, follow these steps:
Switch to the Group Path tab at the bottom of the spreadsheet.
Find the group path for your desired group.
Copy the exact group path, including spaces and punctuation.
Paste the group path into Column A of the main tab.
Note: Sub-groups inherit parent group settings unless you specify different settings for them. Once a group-level setting deviates from the parent group's settings, the group will no longer inherit the parent group's settings.
Note: The last group in the group path determines where the BOI settings will be configured. For example, if the group path is “Amazon School District/Elementary/HR,” the BOI setting will be configured for the “HR” group.
Column B: BOI label
Select the setting you need, such as PO number, GL code, cost center, location, project code, department, or a custom field. This label is what buyers see when they place orders. Keep names clear and consistent across your organization.
Column C: Custom value label
If the BOI label is Custom Field 1–13, provide a custom field name. The custom field name has a maximum of 30 characters.
If the BOI label is not a Custom Field, proceed to Column D.
Column D: Open text field or list of defined options (required)
Select how buyers interact with this setting during checkout:
Open text field: Buyers can type any value.
List of defined options: Buyers select from a dropdown menu that you create.
Column E: Default option
If Column D is set to List of defined options, the value in Column E will be the default value buyers see when choosing their BOI value. To set the default option, follow these steps:
Go to the relevant tab for the setting you are configuring. For example, if you are configuring a PO number setting, go to the PO Number tab at the bottom of the spreadsheet.
In Column A, enter the same group path from Column A of the main tab.
In Column B, enter an option for this value.
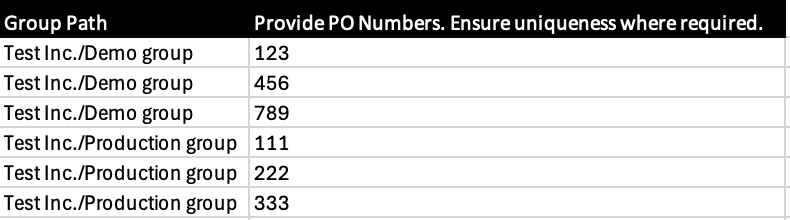
To configure multiple options, add each option in a new row for the same group path. For example, if you wanted to add three options for PO numbers, add three rows: for each PO number option in Column B, all with the same group path in Column A.
After adding your options, go back to the Business Order Information tab.
In Column E, enter the value from the list of options you defined that you would like to be the default option.
Column F: Enabled?
Determine if this field is present or hidden:
Enabled: The field appears during checkout.
Disabled: The field is hidden from buyers.
Column G: Required at checkout?
Determine if this setting is required to place an order:
Required: Buyers must complete this setting to place an order.
Optional: Buyers can skip this setting.
Column H: Customizable note
Enter an optional customizable note displayed to your buyers during checkout.
Complete the column-by-column instructions for each configuration you want to add. Once done, save your changes.
See the following example of a completed spreadsheet:
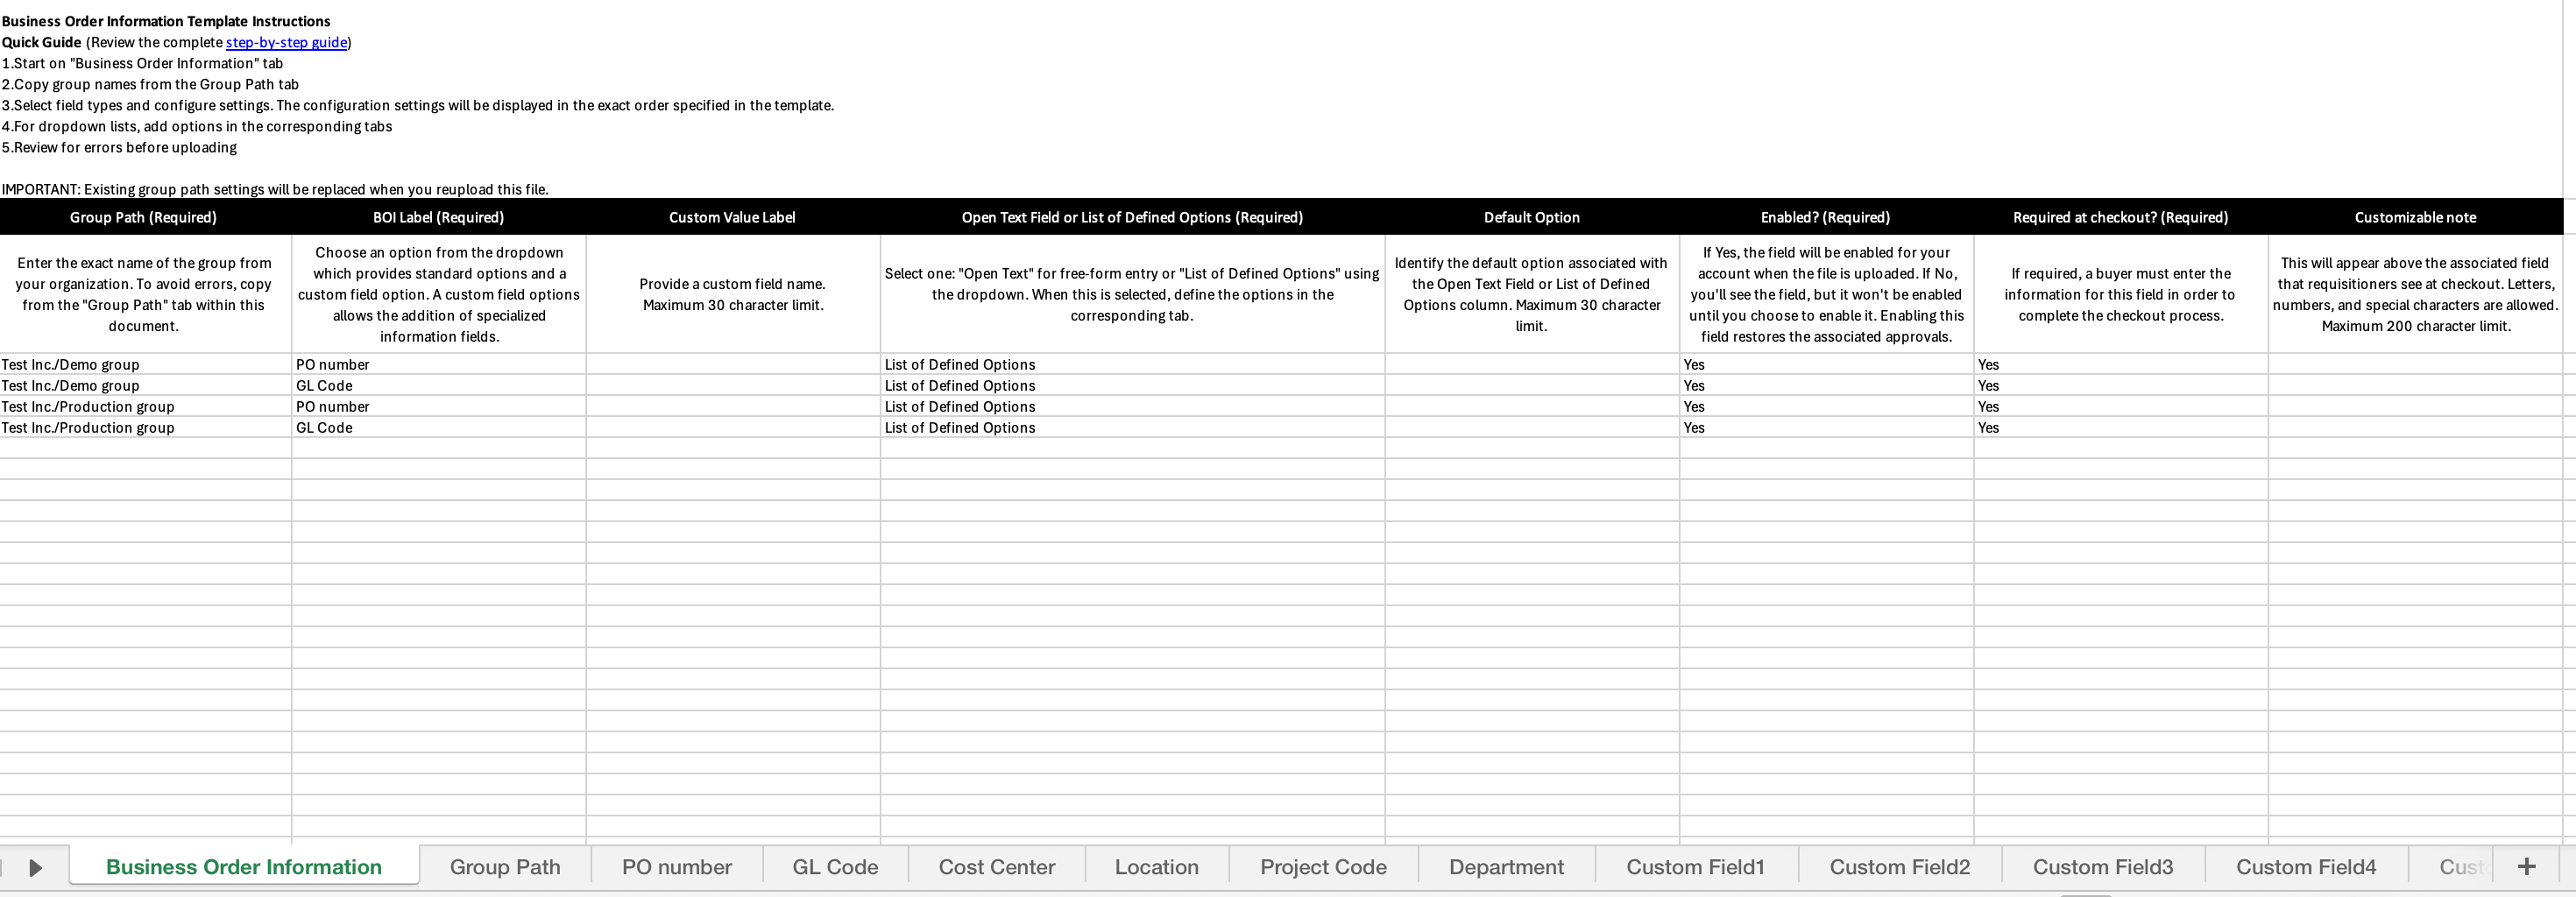
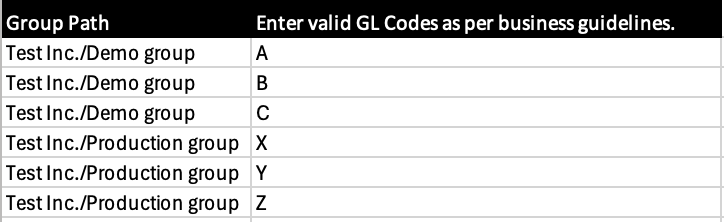
In this example, the spreadsheet defined BOI settings for the PO number and GL code settings. To enable lists of defined options for each of these settings, the following configurations were added in the PO number and GL Code tabs, respectively:
Uploading the template
After you save your completed template, return to Amazon Business to upload it. To upload your file, follow these steps:
Navigate to Upload and edit in bulk.
To add your file, either drag and drop a single file or select the option to choose a file from your computer.
Select Upload file.
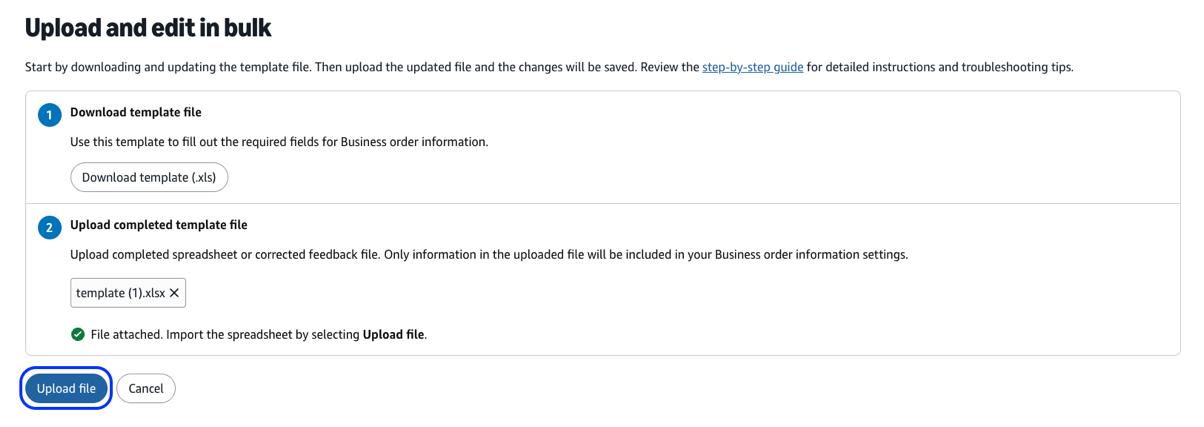
Amazon Business uploads the file and begins processing your configuration. The processing time varies depending on the size of the file.
Monitoring file processing
To check the outcome of an upload, view the processing status on the Activity page. Bulk uploads can have one of three statuses:
| Status | What it means |
|---|---|
| Processing | The file is uploaded and processing within your account. |
| Processed with error | The file is uploaded and errors were found during processing. |
| Uploaded and processed | The file is processed and the information is in your account. |
Note: The Activity page shows the past 14 days of bulk upload activity.

Troubleshooting
If you encounter errors during file uploading or processing, follow these resolution steps and examples:
Upload troubleshooting
If you encounter errors during file upload, use these solutions:
| Error | Solution |
|---|---|
| File type unsupported | Save the file in .xls or .xlsx format only. |
| File too large | Reduce the file to less than 10 MB and upload it again. |
Processed with error troubleshooting
When a file has the status Processed with error, download the feedback file to find and correct the affected rows. To correct and resubmit a file, complete these steps:
Navigate to the Activity page.
Select Download feedback file.

In the feedback file, review the following columns to understand the issue for each row:
| Column | Description | Example |
|---|---|---|
| Validation Results | Indicates whether the row passed or failed validation. | Failed upload |
| Errors Detected | Describes the specific error found in the row. | Default Option: The default value {defaultValue} should be included in the list of options |

Make corrections directly in the cells that contain errors, without changing the structure of the file or removing columns.
Save the corrected file in .xls or .xlsx format with a file size no larger than 10 MB.
Upload the corrected file. To upload from the Activity page, select Upload and edit in bulk. Alternatively, navigate to the Business order information page and select the Actions menu > Upload and edit in bulk.
Troubleshooting tips for processing errors
Use the following examples and solutions to correct common processing errors.
| Error | Incorrect example | Correct example | Solution |
|---|---|---|---|
| Group name not found in your account | ABC / Marketing | ABC Company / Marketing | Verify the exact group path on the Group Path tab and copy it without changes. |
| Invalid options format | Option 1, Option 2 | Option 1 Option 2 | Put each dropdown value in a new row. |




 United States
 India
 United Kingdom
 France
 Germany
 Spain
 Italy
 Canada
 Japan
 Mexico
 Australia


